Comprehensive (E3S) Leviathan Guide
This guide is an alternative to video guides and general information for latecomers who don't want to learn by experimentation.
The strategies I cover in this guide are not the only way to handle their respective mechanics, only the most common that are used in PUGs. Now without further ado, here are the horrible things Leviathan will do to you and how to live through them.
Before Pull Considerations
Tanks
Leviathan's tankbuster, Rip Current is a 2-hit, vuln-applying tankbuster. It comes often enough that each tank will exhaust their invulnerability CDs taking it one at a time. One of every 4 tankbusters must be provoked mid-cast by the off-tank to share damage. Decide which order this will be done in ahead of time.
Decide which side of the arena (East or West) tankbusters will be taken on for Storm Horizon. It doesn't matter which, just pick one, make sure everyone knows and remember it.
Everyone
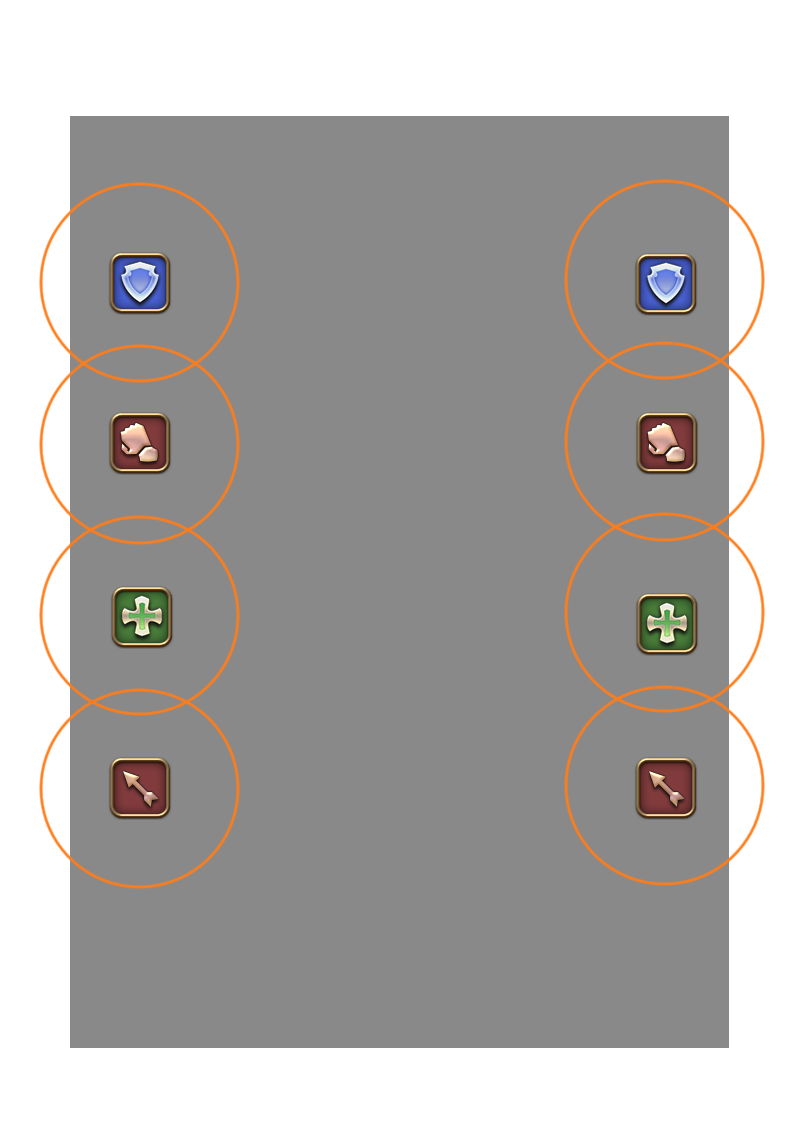
Decide positions for split group mechanics. One healer, one tank, two dps on each side, in a line from north to south. These groups will split to east and west of the center platform for Freak Wave, and split to the platform of their respective side during split platform phases. An optimal party composition would do something like illustrated below.
Phase 1
Tidal Roar
Moderate raid-wide damage. Shield and heal.
Rip Current
The first tankbuster, hinted by an orange target marker on the main tank. Handle as decided pre-pull. This buster is also a line AoE and can cleave the party, just as in normal mode so point it away from the group.
Tidal Wave
A waterfall will appear on the east or west of the arena and Leviathan will begin casting Undersea Quake - you should use Surecast or Arm's Length to nullify the knockback from Tidal Wave around the time the cast bar passes the "Q" in Undersea Quake. Any earlier and the effect will wear off before the knockback hits.
Undersea Quake (1)
The east and west thirds(approx) of the arena will be destroyed, and anyone on them will instantly fall to their death. The knockback from Tidal Wave will hit as this is happening.
During this time you should head to the north of the arena to prepare for Temporary Current.
Temporary Current (1)
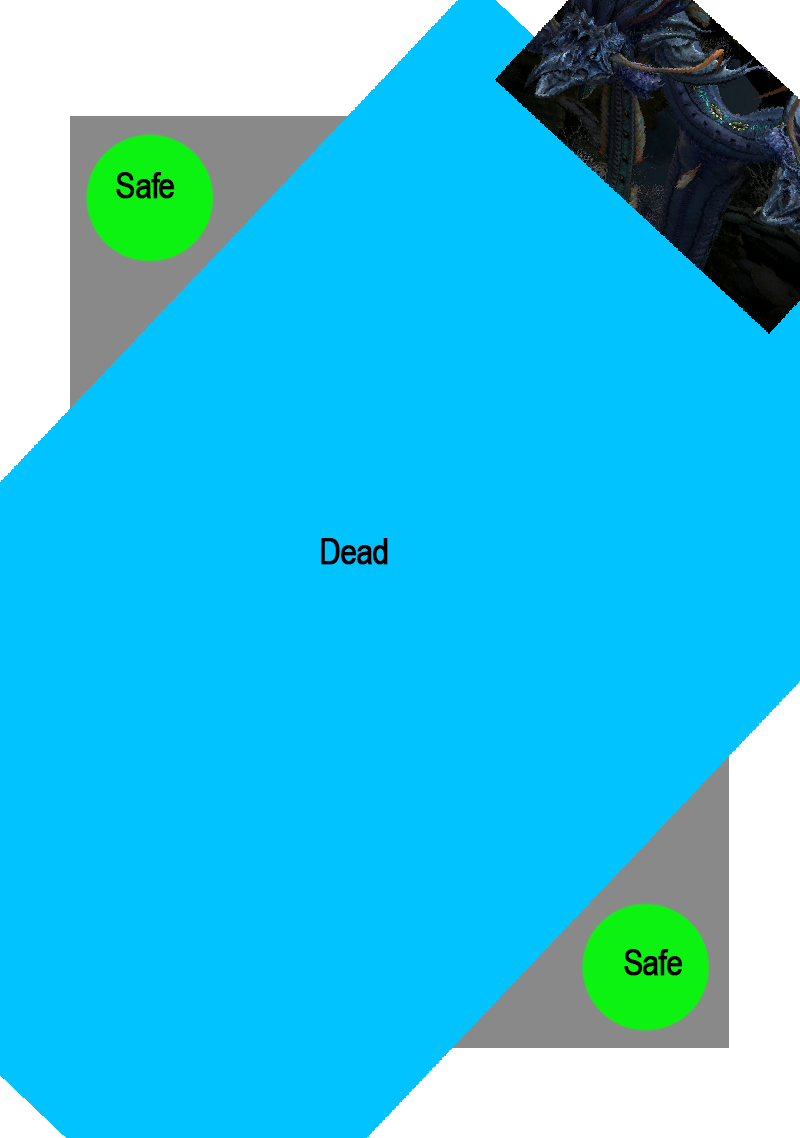
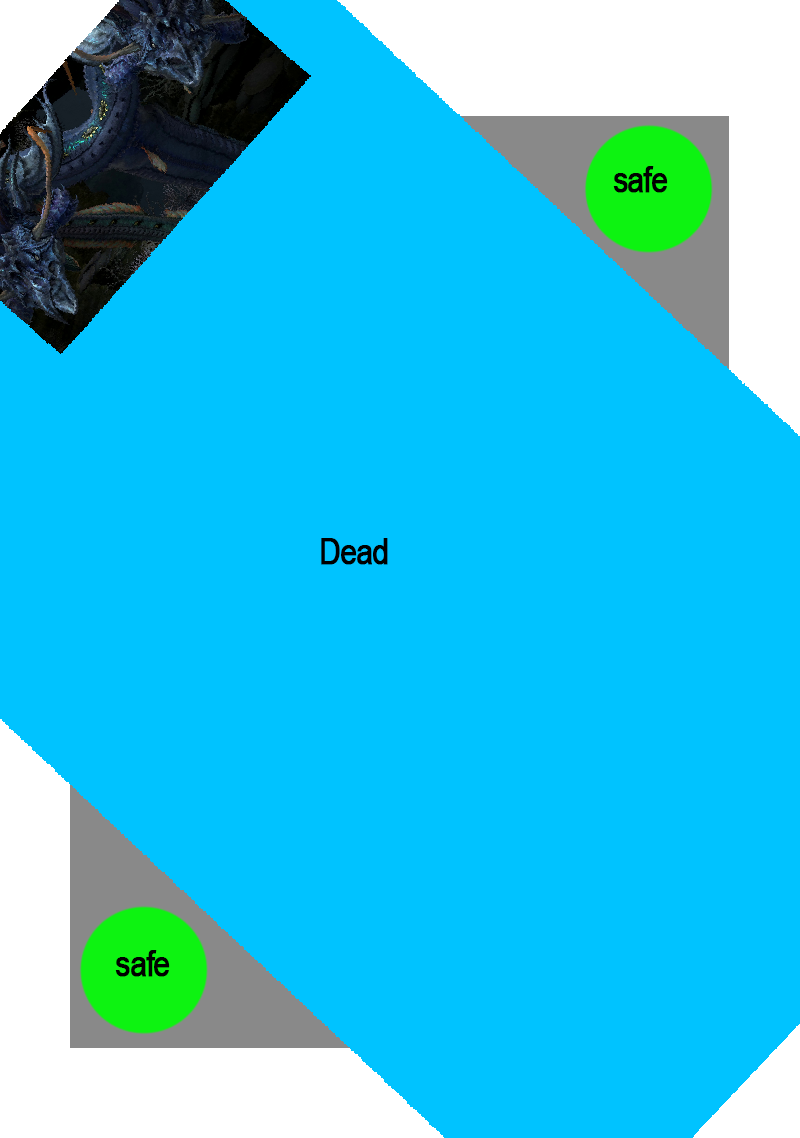
Much like normal mode, this is a diagonal AoE that covers most of the platform and will kill anyone caught inside instantly. This one casts much faster than normal mode, so be on the ball and pre-position to the corrent safe zone opposite from the side of the arena Leviathan's head appears, as illustrated below.
Drenching Pulse
This is a baited AoE that targets every player. Stack up together in the center at max melee range to drop them in the same spot, then split to the positions you decided pre-pull to deal with Freak Wave.
Freak Wave
Circle AoE on each player. Remember the position you decided on pre-pull and stay there until it goes off.
Temporary Current (1)
Immediately following the animation for Freak Wave, prepare for another Temporary Current coming from the opposite direction as the last one. If you are one of the four players in the rear, you only have time to get to the safe zone in the south. If you are one of the four players towards the boss, you only have time to get to the safe zone in the north. Pay attention to the first cast of Temporary Current so you know ahead of time where you're going to go.
After the cast resolves, stack up in mid to heal.
Maelstrom
Leviathan becomes untargetable and disappears from the arena, dropping 3 small puddles in random spots. These puddles will expand, inflicting heavy and moderate damage to anyone that stands in them. They will disappear and be replaced by other puddles partway through.
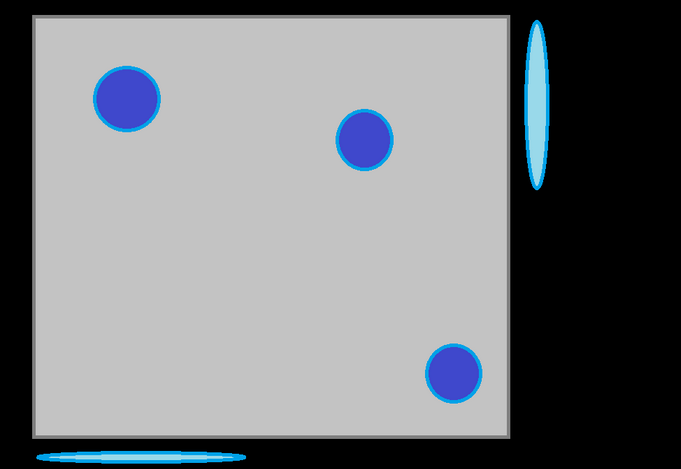
Two portals will appear on a North or South, then East or West half of the arena, just as in normal mode. You need to get to the quarter of the arena not targeted by a wormhole while avoiding puddles, as (beautifully) illustrated below.

Tidal Roar
Same as before. Moderate raid-wide damage.
Tsunami (1)
This is a semi-complicated mechanic that applies debuffs to all party memebrs that must be dealt with in specific ways.
Healers
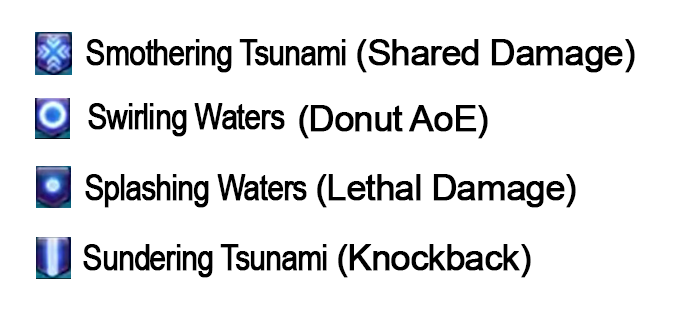
Both healers will be afflicted with Smothering Tsunami, they will stack together with the 3 players they split to sides with to eat the shared damage from this debuff when it falls off (25 seconds after application).
Tanks and DPS
All non-healers will recieve the Swirling Waters debuff, which will deal damage in a donut AoE around the player when it falls off (25 seconds after application).
Everyone
Seven players will recieve the Splashing Waters debuff, which will do lethal damage to them when it falls off (25 seconds after application). This debuff can be cleansed by being knocked back by Sundering Tsunami.
One player will recieve the Sundering Tsunami debuff instead. This will fall off after 8 seconds and knock back everyone in the direction the player is facing.
This sounds like a lot to deal with, but handle the next four mechanics as described and it will be taken care of.
As Tsunami comes out, stack up together in the middle of the arena at max melee range. Once debuffs are applied, the player who recieves Sundering Tsunami should be behind the party and face north. After 8 seconds, this will knock every other player towards the north end cleans their Splashing Waters debuff.
Undersea Quake (2)
As the 7 players are being knocked back, Leviathan will begin to cast Undersea Quake once again. This time, destroying the center of the arena. To avoid falling to your doom, as soon as the knockback goes out immediately run to the side you decided on pre-pull.
Temporary Current (1)
This functions exactly like before, except that because the area is split in two, there is only one safe zone per side of the arena. If the boss' heads are at your side of the arena, your safe zone is on the south end of the platform. Otherwise your safe zone is on the north end.
As Temporary Current is going out, Smothering Tsunami and Swirling Waters will be resolving so it is essential that all four players on each side are stacked together in their safe zone, or all of you will likely die.
Tidal Roar
Standard raid-wide damage. Comes immediately after the split damage from Smothering Tsunami so pre-cast heals as damage is going out.
Rip Current
Tankbuster.
Temporary Current (1)
After a short delay, a second Temporary Current will come from the opposite direction. Your safe zone will be on the opposite north/south side of the platform from the first one.
Tidal Roar
Standard raid-wide damage, followed by the platform reforming.
Phase 2
Refreshing Shower
After this cast, Leviathan's abilities will be enhanced - most doing more damage, and having extra effects.
Tidal Rage
Just like Tidal Roar, raid-wide damage, but even more of it.
Tidal Wave
Exactly the same as before. Surecast/Arm's Length and head to the North of the platform.
Undersea Quake (1)
The sides of the arena fall off.
Temporary Current (2)
Immediately after the knockback from Tidal Wave, Leviathan will begin casting Temporary Current. Like before, head to the safe side at the North of the arena.
Unlike previous Temporary Current casts, this one will be followed up by an instant, no-indicator cast in the opposite direction. You need to begin moving to the opposite east/west side as soon as the animation for the first cast goes off in order to make it to the second safe zone in time.
From this point on, ALL casts of Temporary Current will be followed by an instant, opposite direction cast.
Drenching Pulse
Baited Circle AoE on each player. Stack up middle at max melee range to drop them in the same spot.
Freak Wave (2)
Just as with the previous Freak Wave casts, you will head to your assigned spots on either side to drop your AoE. However, be mindful that you leave each corner of the arena open with room to stand as the AoE will now leave behind a puddle that deals heavy damage and inflicts Dropsy on all players that enter it.
Temporary Current (2)
Exactly like the previous cast. The northern dps and tanks should go to the north corner safe zone and the southern dps and healers should go to the south corner safe zone. Just as before, you will need to immediately run to the opposite east/west side as the animation goes off to avoid the instant second cast.
Maelstrom (2)
This is exactly the same as the previous Maelstrom phase, except there will be three portals to dodge. You need to dodge them by getting into the safe zone for the first two, then moving out of the path of the third and into the safe area left by the first as soon as it goes off. As before, avoid the puddles that inflict Heavy.
Tidal Rage
Heavy raid-wide damage.
Rip Current
Tankbuster. The tank or tanks taking the buster should move to the side of the arena decided on pre-pull for Storm Horizon. As the tankbuster is going out, the rest of the party should move to the opposite side.
Storm Horizon (AKA Wet Pantokrator)
If you remember O11S, this will be easy.
Every member of the party will suffer constant AoE damage, and begin to drop baited puddles. Each person will drop 5 puddles, one after another.
In the mean time, a tank will be targeted with a Flare marker.
As the 5th puddle is dropping, Leviathan also begins casting temporary current. Fun!
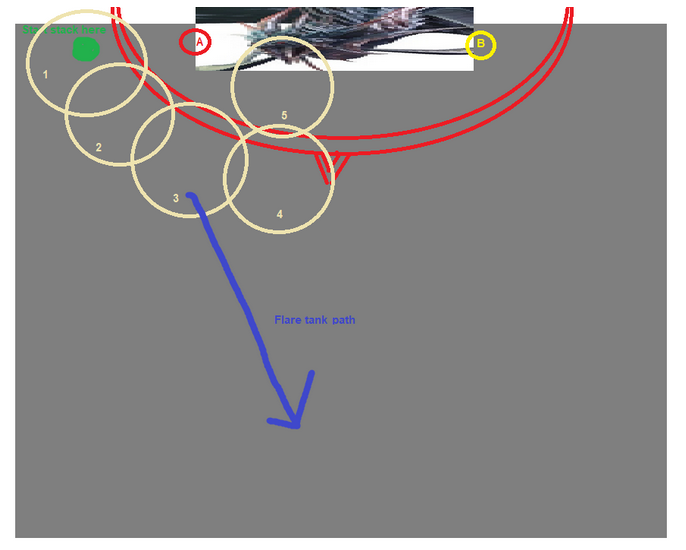
As the first baited AoE comes out, the group should move together to just outside the edge of the aoes to drop the next, continuing along the line of the boss’ hitbox. As the third puddle comes out, one tank will receive a flare marker. That tank should split off from the group and head south.
The other players should continue to drop the 4th puddle around the middle of the boss’ hitbox and the 5th inside the hitbox. At this point, Temporary Current will have began casting and the party should head to the North safe zone, while the flare tank heads to the opposite side on the South.
Just as before, immediately after the Temporary Current cast goes off, you should immediately head to the other side as an instant cast comes next. Keep the party together for the next mechanic, and have the second tank rejoin.
Plunging Wave (AKA Wet Akh Mourne)
This is a massive damage line AoE that must be shared by the whole group (think Headlight on Ghost Train) - it will fire 5 times in a row and immediately be followed up by...
Tidal Rage (x2)
Heavy raid-wide damage, twice in a row.
Drenching Pulse
Like before, stack up middle at max melee to bait circles.
Freak Wave (2... point five?)
Just as before, everyone will be targeted by AoEs that will drop puddles… however, you need to drop these puddles on the outside portion of the arena, which will be destroyed about 1 second after the animation goes off and then run in. If you leave a puddle in the center portion, you will probably wipe the group on the next mechanic.
Tsunami 2 (AKA Hello Whorl)
Welcome to the big leagues, once you get this down, you've got the end in sight.
Like the first Tsunami, this will apply a bunch of debuffs to everyone - some of these are a bit different than the first time though.
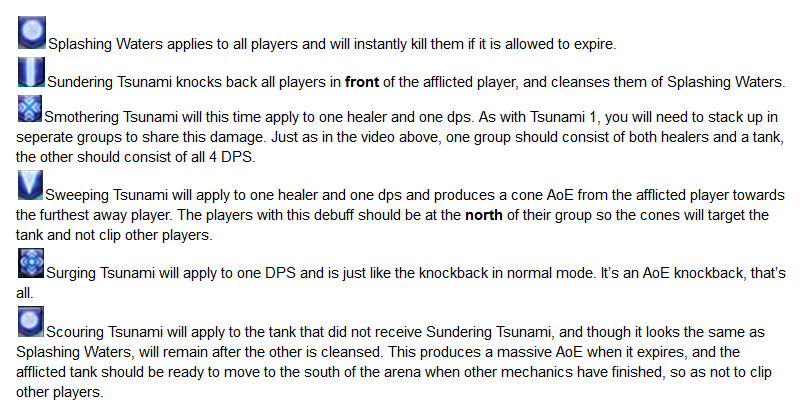
I suggest handling this mechanic as shown in the following video, made by the static "My Bad" on Excalibur:
Got it? Well, just in case, let's break that down into easy to digest steps.
Step 1
The DPS afflicted by Surging Tsunami heads to the center north of the arena, with the rest of the party standing immediately behind them. The party is then knocked back to about the middle of the arena.
Step 2
The players split into groups (HTH and DDDD), but not stacking directly on top of eachother. The tank that will be baiting the Sweeping Tsunami cones heads to the very north of the arena to ensure they are the furthest player away. The DPS with the Sweeping Tsunami debuff must make sure to stand slightly to the north of their group, to avoid clipping anyone with the cone.
Step 3
The DPS with Sundering Tsunami runs to the north, while facing south, with the rest of the party standing behind them to get knocked back.
Step 4
The tank with Sundering Tsunami gets behind the party at max melee range and faces north, to knock the party back to the north edge. This knockback resolves Splashing Waters on all remaining players.
Step 5
The tank with Scouring Tsunami heads to the South of the platform so they don’t kill the party with their nuke debuff.
Everyone should then stay North, with the southern tank rejoining ASAP - preferably with a gap closer.
Temporary Current (2)
Exactly like the last ones. After finishing, the platform comes back together.
Tidal Rage (x2)
Heavy raidwide damage, twice.
Rip Current
This is the final tankbuster of the fight. Handle as needed.
Roiling Pulse
Similar to Drenching Pulse, bait center to drop aoes, then immediately move to your designated side of the platform as the middle of the arena will soon be destroyed by Undersea Quake 2.
Each healer will be targeted by an AoE stack marker as each tank is also targeted with a flare. The healers and their 2 dps partners should head to the the North side of their arena section to soak the stack marker together, while the tank should head south to take their flare alone.
Undersea Quake (2)
The center of the arena is destroyed as the stacks and flares resolve.
Black Smokers
This is the last real mechanic of the fight, you're almost there.
We'll break this down into easy parts -
Tanks
Each tank will be targeted by repeated conal AoE attacks, the tanks should stand as close to the north edge of their arena section as possible so as not to cleave the group.
DPS
One DPS on each side of the arena will be tethered to the boss and begin to drop puddles. These puddles deal moderate damage and apply a magic vuln debuff if stood in - however, if no one stands in them, they will explode and kill everyone.
The easiest way to handle puddle soaks is to have the tether dps drop a puddle near the party, and have the healer soak the first blast. Then drop the next puddle upwards a bit and have the non-tethered dps soak the second blast. The third puddle will drop about the time the healer’s magic vuln is wearing off, so the healer can soak another puddle, then the tethered dps drops the final puddle away from the party and stands in it, soaking the last blast themselves.
Healers
You will be soaking the 1st and 3rd puddle dropped by the tethered DPS, while healing yourself and the tanks who are taking constant damage. Make sure to save some oGCDs for this phase.
For a visual reference, please see another helpful guide by "My Bad" on Excalibur:
Temporary Current (2)
As the final puddle for Black Smokers is resolved, Leviathan will begin casting Temporary Current again. Like before, there will be an instant cast in the opposite direction immediately after the first resolves.
Because the arena is cut in half, you will need to run South -> North or North -> South instead of sideways for this cast - like you did during Tsunami 1, but faster.
Tidal Rage
After the second cast of Temporary Current goes out, heavy raid-wide damage will hit and the platform will reform.
Tidal Rage (x2)
Heavy raid-wide damage will come out again, twice.
Enrage
The Calm
This is a soft enrage, much like the final phase of Final Omega. Leviathan will cast Tidal Rage 4 times in a row, gaining a damage up +1 buff each time.
The Storm
After finishing the 4th cast of The Calm, Leviathan will begin a slow cast of The Storm. If this cast finishes before you kill him, it's back to the start with you.
That's a wrap!