How To Summon Good And Not Be Bad At Casting - Endwalker Summoner Guide
This is a first draft at introducing the new Summoner job to players in the 6.0 expansion, Endwalker.
I say new job, because wow - Summoner has been completely overhauled. It shares barely anything in common with its previous incarnations and it is incredible.
About This Guide
As with my previous guide, this one is aimed at all levels of player - from the brand new casual to raiders. At times it may feel like I go into too much detail for more experienced players. It's an in-depth look at how Summoner works in combat and how to best make use of its abilities.
Preface
Summoner is still a highly mobile caster - in fact much more than before. You'll find yourself standing still to cast only 2-3 times every minute in combat.
As a magical ranged DPS, Summoner does a great deal of damage and brings personal mitigation, group mitigation, group damage buffs, a resurrection and even a bit of healing to the group! It's a well rounded job and any group would be remiss to exclude one.
The job is now very simple to execute - I would say the easiest of the caster classes, and yet still leaves a bit of room for optimization.
What do all my buttons do?
Unlike the previous guide, I wont go over each and every spell and ability, showcasing their effects directly - Square Enix now has a wonderful Job Guide on the Final Fantasy XIV website that does a much better job of that.
Instead I'll be going over the core categories of your job actions, and what they're used for.
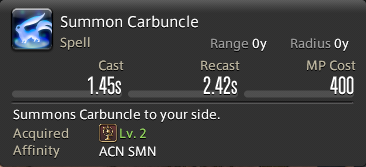
Carbuncle
Ever your faithful companion, Carbuncle should be at your side at all times. Make sure to Summon him before combat begins, or upon being resurrected should you die - he's required for most of your actions!
Carbuncle will replaced temporarily in combat when you summon other primals and demi-primals. It's important to note this because...
Carbuncle Utilities
Your carbuncle has a couple of utilities that help you and your group out - namely Radiant Aegis and Searing Light. They can only be used when Carbuncle is out on the field.
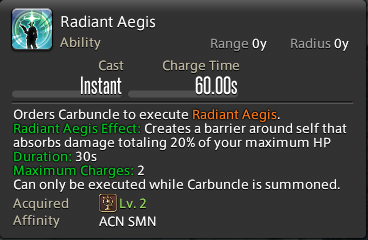
Radiant Aegis is your Personal Mitigation - this ability should be used to help avoid damage targeted at you specifically. Popping this spell before you recieve damage that your healer would otherwise have to heal off of you and you alone is a great way to make them happy.
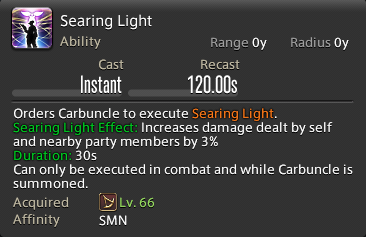
Searing Light is your group Damage Buff - this ability should be used in tandem with other damage buffs from your group, such as when your Astrologian uses Divination or your Ninja uses Trick Attack. Those buffs will stack up multiplicatively and let everyone in your party do even more damage.
Trances
These are the biggest part of your overall damage rotation in combat.
Trances replace your carbuncle with a different summon, and transform several of your spells into more powerful versions with new effects!
Aethercharge, later replaced by Dreadwyrm Trance and finally by Summon Bahamut is your first one. You'll use this within the first few seconds of any fight!

Upon use, your carbuncle will be replaced with Demi-Bahamut for 15 seconds. You should consider this your most powerful 15 seconds in combat and do your utmost to use it within buffs from your group and as often as possible.
While he's out, Bahamut will auto attack whichever target you attack with his special ability, Wyrmwave.
Your Astral Flow and Enkindle abilties will become Deathflare and Akh Morn respectively. These abilities do an incredibly large amount of damage.
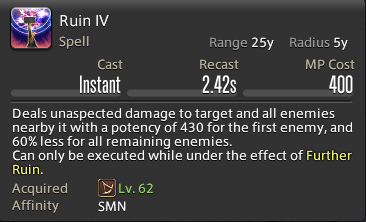
Your Ruin III and Tri-Disaster will also change into new versions of themselves that do more damage and cast instantly.
Firebird Trance
Extremely similar to your Bahamut phase, Summon Phoenix will replace Carbuncle with Phoenix and alter all of the same spells as Bahamut.
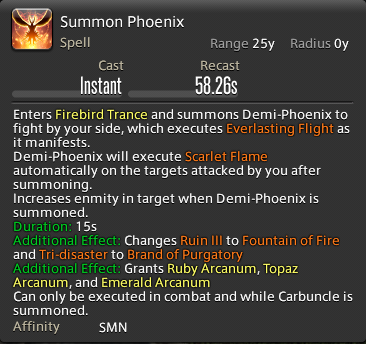
The key difference during the Phoenix phase is two healing properties:
- Upon being summoned, Phoenix casts Everlasting Flight, which puts a large HP regen on every party member around you. It's like a free Medica II from a White Mage!
- Your Astral Flow becomes Rekindle, which is a single target regen heal. You should generally cast this on your tank or a party member who is sustaining a large amount of damage. Coordinate that with your healers when possible!
In the Macros section near the bottom of this guide, I've included a macro that will automatically cast Rekindle upon one of your tanks, which should be good for most situations.
New: As of patch 6.05, your GCDs under Phoenix deal significantly more damage.
Fountain of Fire, your single-target GCD, has had its potency increased by 90 to a total of 520. Brand of Purgatory, your AoE GCD, has had its potency increased by 60, to a total of 240.
This does not impact your rotation, but missing a GCD in this phase is now even more punishing to your overall damage, so be extra sure to get that tiny bit of SpellSpeed you need to hit all 6 reliably.
Primal Phases
This is Summoner's biggest feature now, and the bulk of your time in combat!
Every time you finish a Trance, you gain 3 special resources - Fire Arcanum, Earth Arcanum, and Wind Arcanum, denoted by these colored gemstones on your Job Gauge.

Each of these Arcanum charges can be spent to summon their respective elemental Primal - Ifrit, Titan and Garuda.
Upon casting, these spells will cause Carbuncle to be replaced with the primal of choice (or an Egi, if you aren't level 90 yet) - but just for a few seconds, unlike Bahamut and Phoenix.
The summoned primal will cast a hard-hitting AoE spell, then temporarily change some of your abilities, much like the Trances.
One very important thing to note is that you can execute these phases in any order you wish. Their abilities and effects are all different, but you can pick and choose which one is best to use first, second and last.
Key Differences from Trances
In your Bahamut and Phoenix Trances, Ruin III, Tri-Disaster and Astral Flow were changed. During a Primal "mini-Trance", the spells Gemshine, Precious Brilliance and (only at level 86 and later) Astral Flow will be changed.
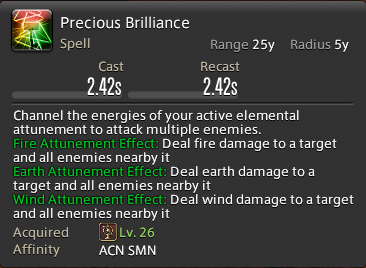
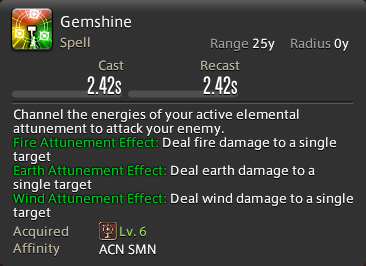
Like Ruin III, Precious Brilliance will be your single target spell during these phases. Gemshine will similarly be your AoE.
As an aside, you may be thinking something like "Why didn't Square Enix just make Ruin III and Tri-Disaster change for these phases too, instead of making these two other spells that basically do the same thing?" - That's a great question. We'd all love to know why as well.
Now, the new spells you get during this time have completely different properties depending on the primal phase, so I'll go over each one in detail.
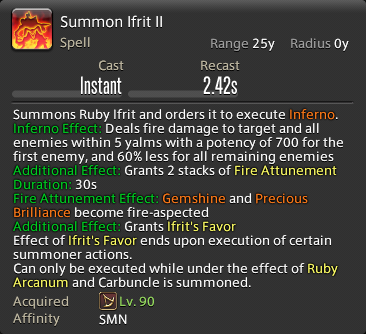
Ifrit
When you summon Ifrit, he'll do his big AoE attack and grant you with 2 charges of Fire Attunement - these charges let you execute either your Gemshine or Precious Brilliance abilities.
Gemshine - Single Target
During your Ifrit phase, your single target ability is Ruby Rite.

Ruby Rite is a significantly more powerful version of Ruin III that takes a little bit longer to cast. Because of this, you want to try to time your Ifrit summon at a point where you know you can stand still for about 6 seconds or so!
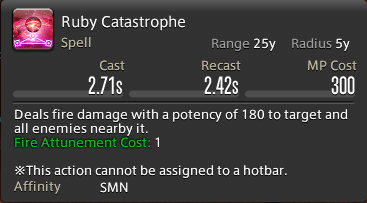
Precious Brilliance - AoE
Likewise, during Ifrit your AoE ability is Ruby Catastrophe. A more powerful version of Tri-Disaster that takes longer to cast!
Astral Flow
Post level 86, Ifrit's summoning will also grant you a charge of Ifrit's Favor, allowing you to cast Astral Flow, which has turned into Crimson Cyclone.
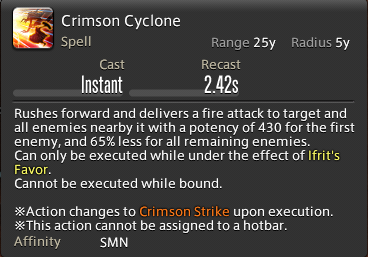
This is an instant cast Spell that makes you dash toward the target, into melee range! For this reason, you want to do your best to time your Ifrit Phase for a point that you know you'll be safe near the boss - avoid summoning him when there will be point blank AoEs, or when the melee DPS need to be spread out.
On the plus side, you can also time this ability to be used when you know you need to be near the boss, saving you the time to walk over to it.
Crimson Cyclone is also your only Combo Ability - after casting it, it turns into Crimson Strike, an instant melee-range AoE.
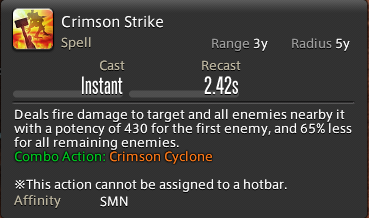
If you've never played a melee job or Dancer, this means that you must cast Crimson Strike immediately after Crimson Cyclone. If you cast anything else in between, you will lose the opportunity for the follow-up spell.
Because of this combo chain and the long cast times of your Single Target and AoE spells during the phase, Ifrit's phase is probably the most complex and needing of consideration in any given fight. Think about when to properly utilize it while learning an encounter!
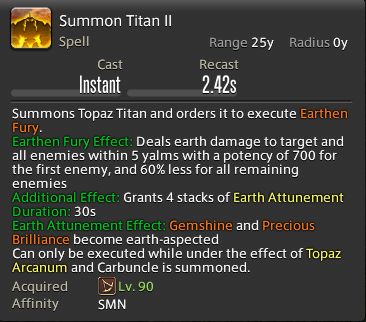
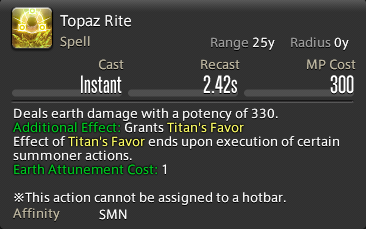
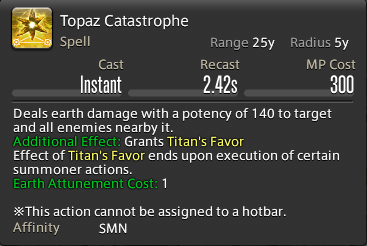
Titan
Like the others, Titan will first replace Carbuncle and use his large AoE, then grant you 4 charges of Earth Attunement.
Gemshine - Single Target
Your single target ability under Titan will be Topaz Rite, an instant cast GCD that's slightly more powerful than Ruin III.
Precious Brilliance - AoE
Your AoE ability under titan will be Topaz Catastrophe, an instant cast GCD that's slightly more powerful than Tri-Disaster.
Astral Flow
Both Topaz Rite and Topaz Catastrophe will grant you the buff Titan's Favor upon casting. You can consume this buff each time to use your Astral Flow ability, Mountain Buster.
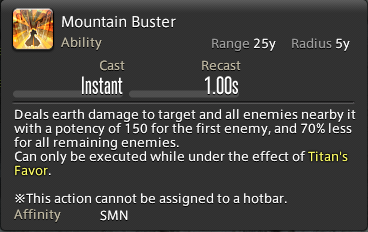
Mountain Buster is an AoE off-GCD ability, meaning you can use it immediately after casting your instant-cast spells without waiting for the global spell cooldown.
Note that you cannot stack Titan's Favor, if you cast Topaz Rite or Topaz Catastrophe without using up your buff on Mountain Buster, you will simply overwrite the buff and lose a cast of it.
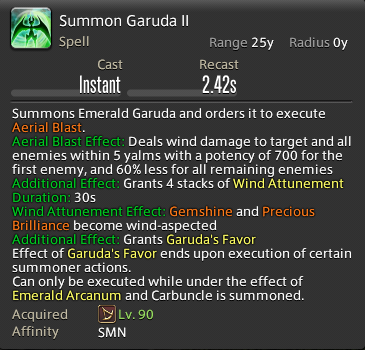
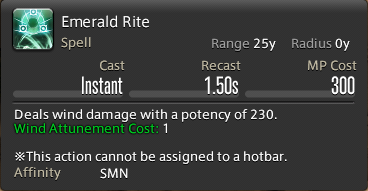
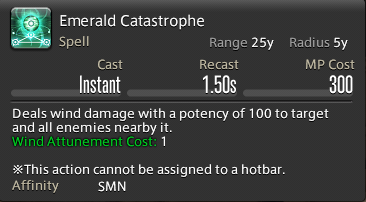
Garuda
Garuda will, like the others, replace your Carbuncle and do a large AoE ability. You will be granted 4 stacks of Wind Attunement and the buff Garuda's Favor.
Gemshine - Single Target
Your single target ability under Garuda Phase will be Emerald Rite, an instant-cast GCD that is slightly weaker than Ruin III but recasts extremely fast. You can get all 4 casts of this spell out in under 6 seconds!
Precious Brilliance - AoE
Similarly, your AoE ability in Garuda phase, Emerald Catastrophe is slightly weaker than Tri-Disaster but recasts much faster.
Astral Flow
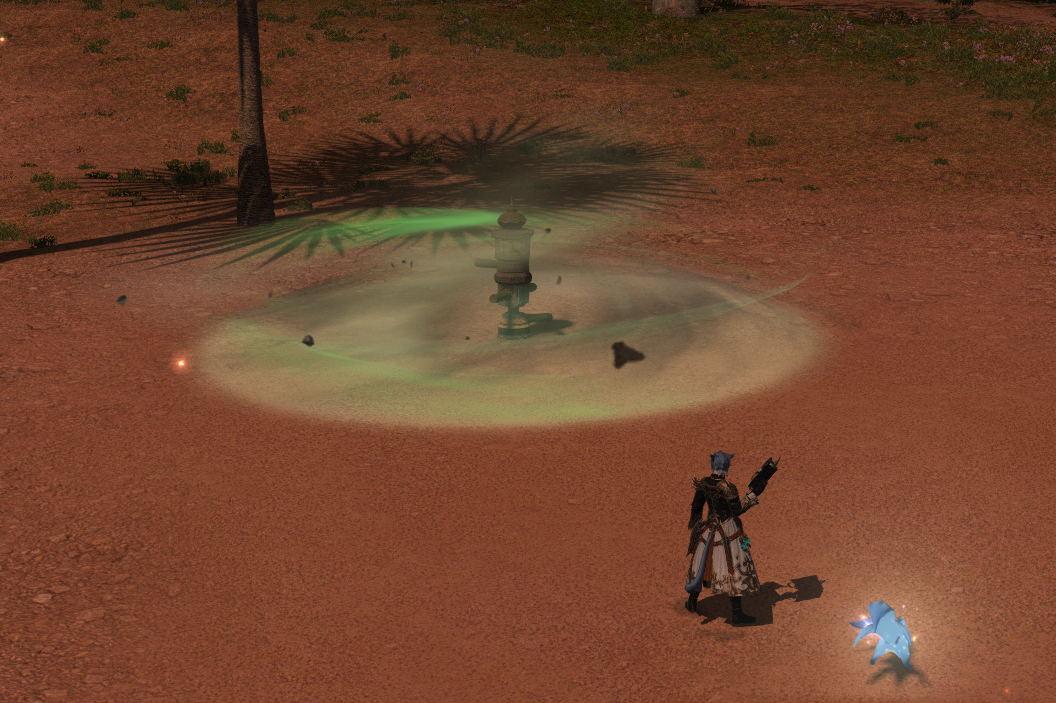
Under Garuda, your buff of Garuda's Favor turns Astral Flow into Slipstream, a very long cast that deals significant damage and places a Damage Over Time effect underneath its current target for the next 15 seconds.
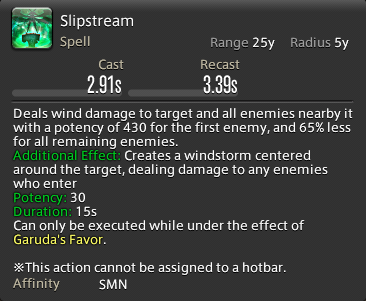
Note that this effect stays where it is initially placed, so plan accordingly and don't use it right before the target(s) will move elsewhere!
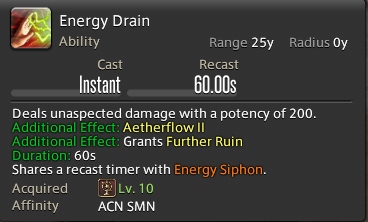
Energy Drain & Aetherflow
Your secondary resource, Aetherflow, is recharged by using Energy Drain for single targets or Energy Siphon, for multiple targets.
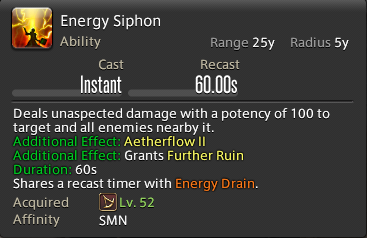
You can then spend your Aetherflow on either Fester, for single targets; or on Painflare, for multiple targets.
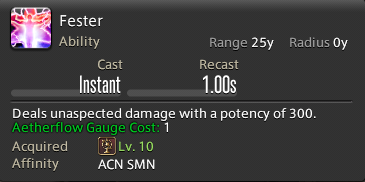

There's not much nuance to these abilities - you should use Energy Drain/Siphon as soon as it's available and make sure to use Fester/Painflare before it comes up again - ideally when you have damage buffs from your party.
Ruin IV
Using Energy Drain or Energy Siphon has a secondary effect - that is granting you the buff Further Ruin. Under Further Ruin, you will have a single use of Ruin IV available.
Ruin IV is an instant cast spell that deals significant damage, and hits multiple targets near your main target for a bit less. Much like Fester and Painflare, you should aim to use it under buffs, and before you need to cast Energy Drain/Siphon again - or your risk losing a cast of it.
The Fillers
When you have no charges of your Arcanum gems, and your next Trance is still on cooldown, these are what you should be casting.
Ruin III
Ruin III is your filler Single Target spell. It does moderate damage and casts in 1.5 seconds - this leaves you enough time to use an off-GCD ability (like Energy Drain, Fester, etc) before you need to cast your next spell.
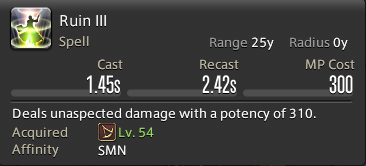
Tri-Disaster
Your filler AoE spell is Tri-Disaster. It does light multi-target damage to groups of enemies. Like other AoE alternatives such as the elemental Catastrophe spells, it should only be used on groups of three or more enemies. Using it on one or two is less damage than a single-target spell!
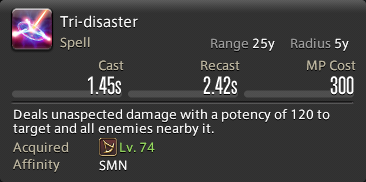
That being said, you should rarely find yourself using them more than once or twice a minute (depending on your spellspeed, it could even be 0 times). If you end up needing to use either Ruin III or Tri-Disaster 3 or more times in a row, it's likely you've missed an important spell earlier or done something wrong.
Other Utilities
As a caster, Summoner has several abilities that serve not to deal damage, but to prevent damage or deal with other situations in combat.
Swiftcast
Swiftcast is used to make your next spell cast instantly, with no cast time. While learning a fight, it's best to save it for your Ressurection ability to bring a party member back to life - ideally a healer, since your healers will generally be bringing other party members back to life most of the time.

Surecast
One of the most useful spells in harder content, Surecast has two effects. For six seconds, it both prevents your spells from being interrupted and it prevents you from being knocked back or pulled in by almost all effects.
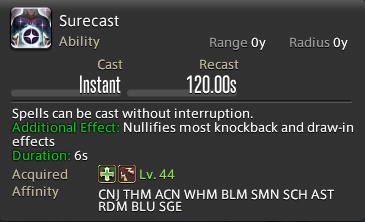
When well timed, Surecast is best used for situations where you know you need to stand still and cast - such as your Ifrit Phase spells, or Garuda's Slipstream - but would otherwise be interrupted by fight mechanics that send you flying.
Lucid Dreaming
While you wont often run out of mana, it's a good idea to use Lucid Dreaming when available to prevent it in long fights.
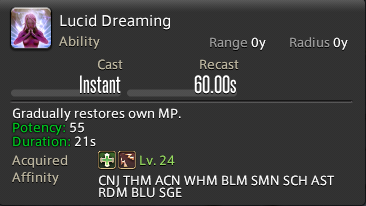
Lucid Dreaming causes you to slowly regen more mana than normal over the next 21 seconds. If you find yourself killed by a boss and revived, use this ability ASAP to get back into fighting shape and avoid being unable to cast.
This is especially helpful if you've had to use Resurrection multiple times in a row.
Addle
Perhaps the most useful utility for Summoner in Extreme, Savage and Ultimate content, Addle reduces the damage done by any enemy target.
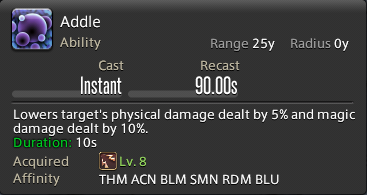
While more effective on magical damage, Addle also reduces the physical damage dealt to your party as well. Coordinate with your healers on when to best use it!
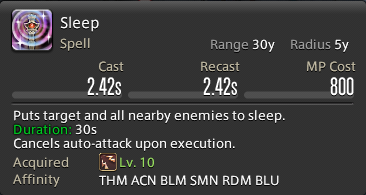
Sleep
While not really useful in a group, Sleep puts your target to sleep - preventing it from doing anything for 30 seconds, or until attacked.
Physick
Physick is utterly useless as a Summoner. You probably shouldn't even have it on your bar. The cure potency scales with the Mind stat, which you will never have.
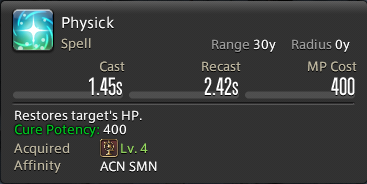
The one single case where Physick could be useful is to trigger a Paladin's Divine Veil ability, if for some reason, both healers are completely unable to.
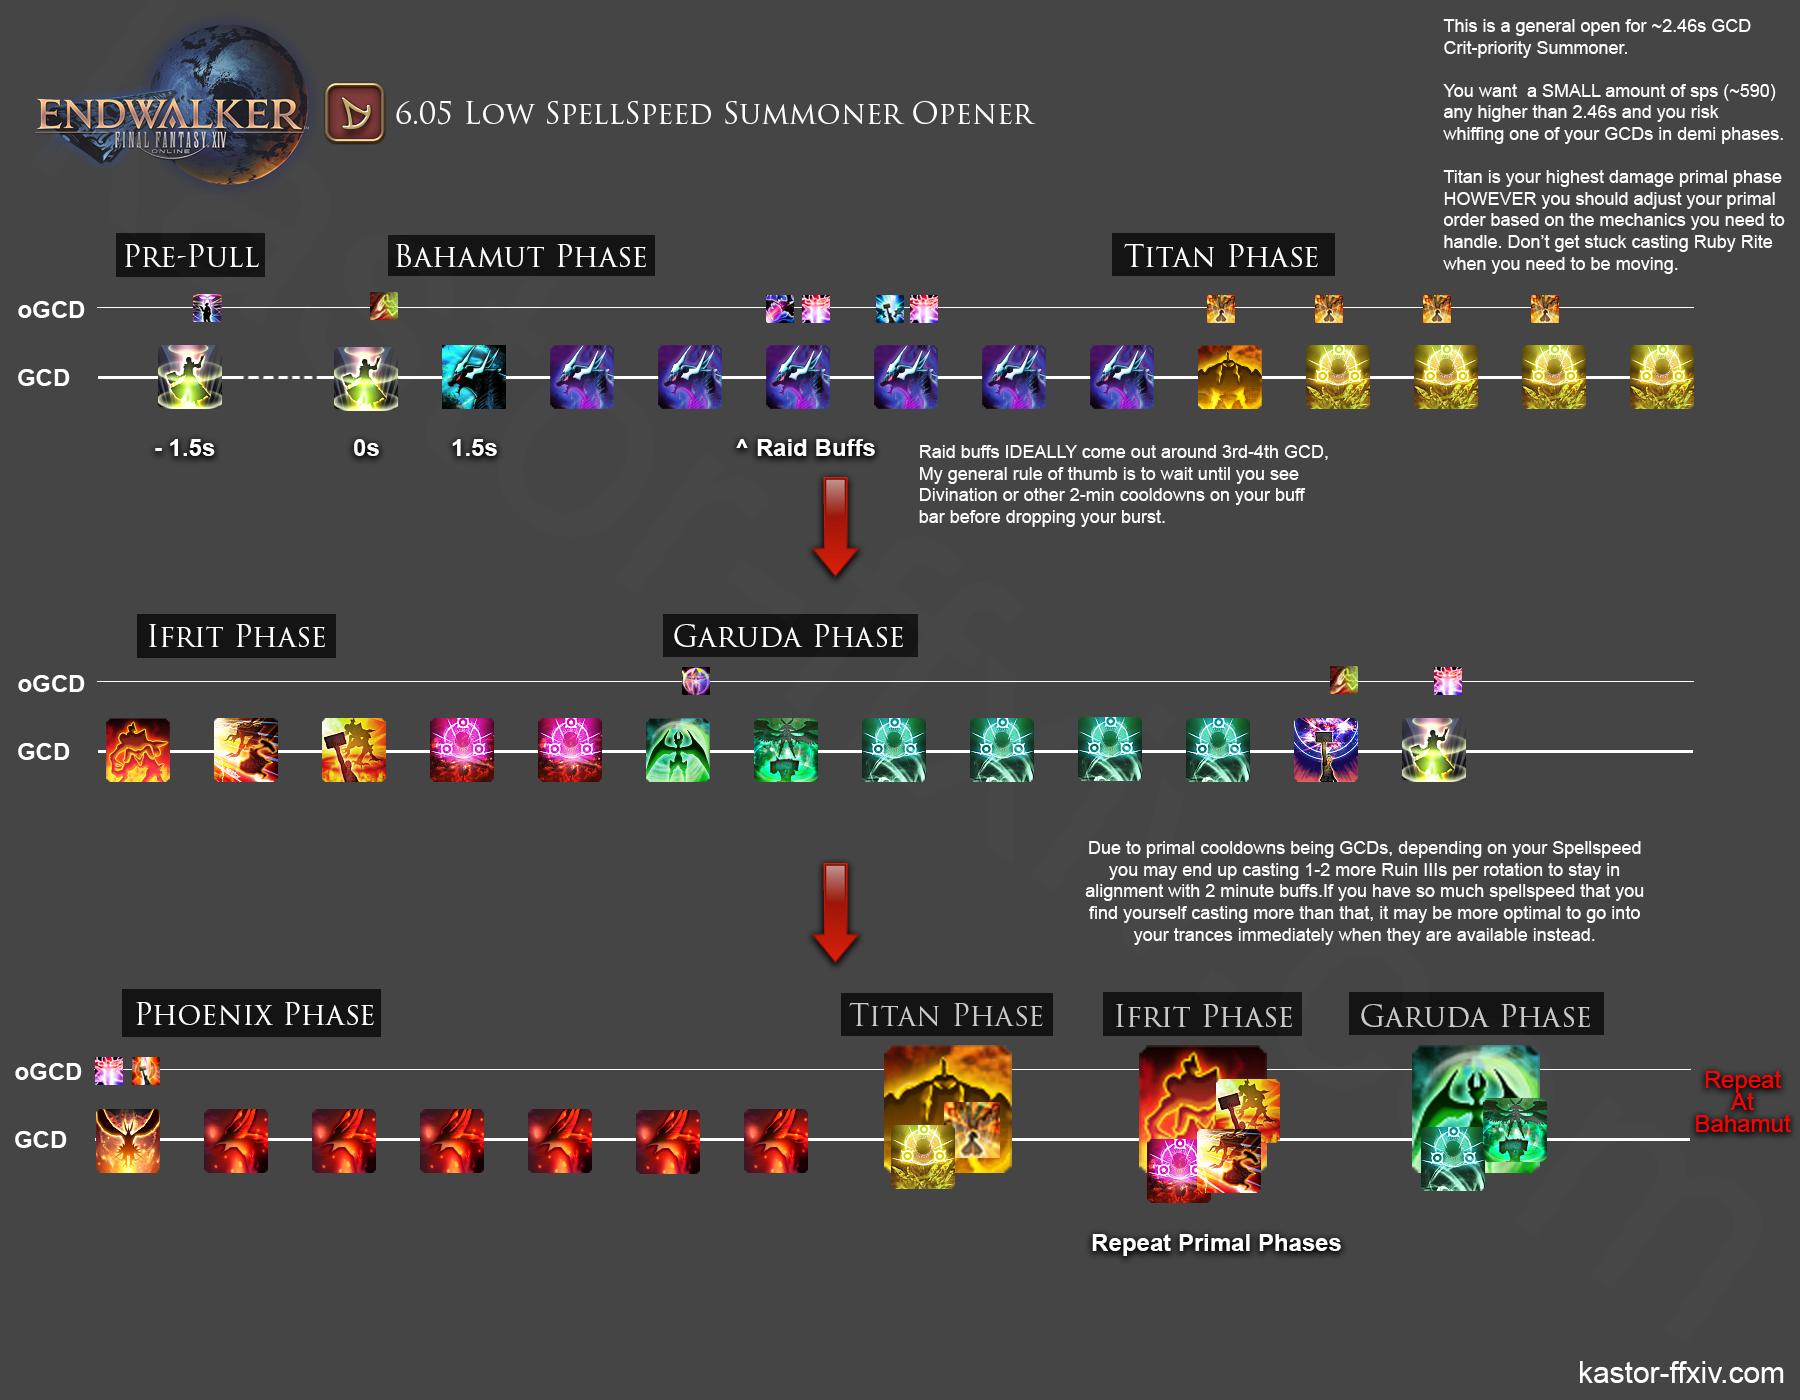
Rotation
As it's very early in the expansion, rotations will take some time to figure out - however the below graphic shows my best attempt at simulating a solid combat rotation for optimal damage.
Macros
There's not a lot of useful macros for Summoner, but these two tend to be helpful for me.
Rekindle
This macro will automatically apply your Rekindle healing effect to the friendly target of your current target (usually the main tank!), when you're in your Phoenix Trance.
/micon "Rekindle"
/ac "Astral Flow" <tt>
Resurrection
This macro will cast Resurrection, and notify in Party chat of who is being revived. This can be helpful in groups where you aren't communicating via voice chat - so no one else tries to revive the same target!
/micon "Resurrection"
/ac "Resurrection" <wait.1>
/p Resurrection on <t>
The <wait.1> followed by the Party Chat line makes sure you don't spam your chat log if you click multiple times in a row.
Conclusion
Summoner is a much different job than it was in Shadowbringers and earlier - and a lot easier to play well. But most of all, it looks cool and it's a ton of fun! I hope this guide helps you learn to play well and succeed!
Changelog
1/5/2022 - Updated the rotation infographic w/ buff info, and Phoenix Demi-summon section w/ info about the 6.05 changes.